In my last blog post, I have written about how to turn a Raspberry Pi into a serverless platform with the lightweight S implementation . If you haven't checked it out already, you can find the link to the post below:
Please note that a Raspberry Pi is not required here.
faasd can be installed without issues on any other machine or cloud instance as well.
This blog post from Alex Ellis describes how to build a faasd serverless appliance on DigitalOcan:
I did that only as a small hobby project. But then, I wanted to use this setup for a real-world use case, and also use the opportunity to try another useful open-source project which is .
Inlets is a cloud native tunnel that allows you to expose private endpoints to the Internet. In this case, it will be used to expose the OpenFaaS gateway running on my Raspberry Pi board to receive incoming Stripe Webhook events and dispatch them to the relevant function.
For more details about inlets, check the official docs and resources available at
So in this post, I will describe how I built a local OpenFaaS function that serves as a Stripe webhook. This function simply sends a Slack notification for every new charge.succeeded event.
The architecture
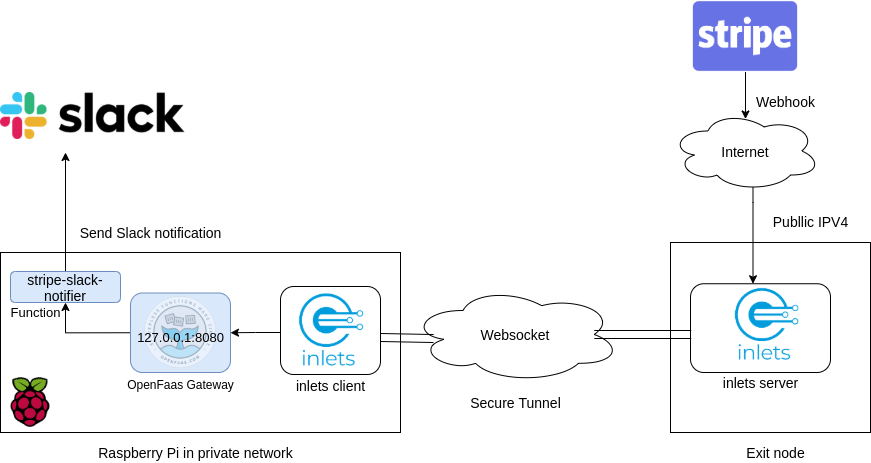
Inlets is an open source HTTP tunnel which we can use to get a public IP address to receive webhooks. The inlets client will be running on the Raspberry Pi and connects to the inlets server using a websocket connection to listen for any incoming requests.
In our setup, every Stripe webhook event that is received by the inlets client will be forwarded to the OpenFaaS gateway on the Raspberry Pi, which will in turn trigger the stripe-slack-notifier function to send a new Slack notification.
Preparing the Setup
Obtain an exit node with inlets
First, make sure you have created an inlets exit server following this nice guide by Alex Ellis:
This would allow you to have an exit node with a public domain that can be used for receiving webhook events. In the setup described earlier, the inlets client is running on the Raspberry Pi, so I have chosen the upstream to be , which is the OpenFaaS Gateway URL.
Using the token provided by the inlets server, the command below exposes the OpenFaaS Gateway to the Internet:
$ inlets client --remote wss://${REMOTE_EXIT_NODE} --upstream http://127.0.0.1:8080 --token ${INLETS_TOKEN}Our function will then be available from the Internet using the https://${REMOTE_EXIT_NODE}/function/stripe-slack-notifier
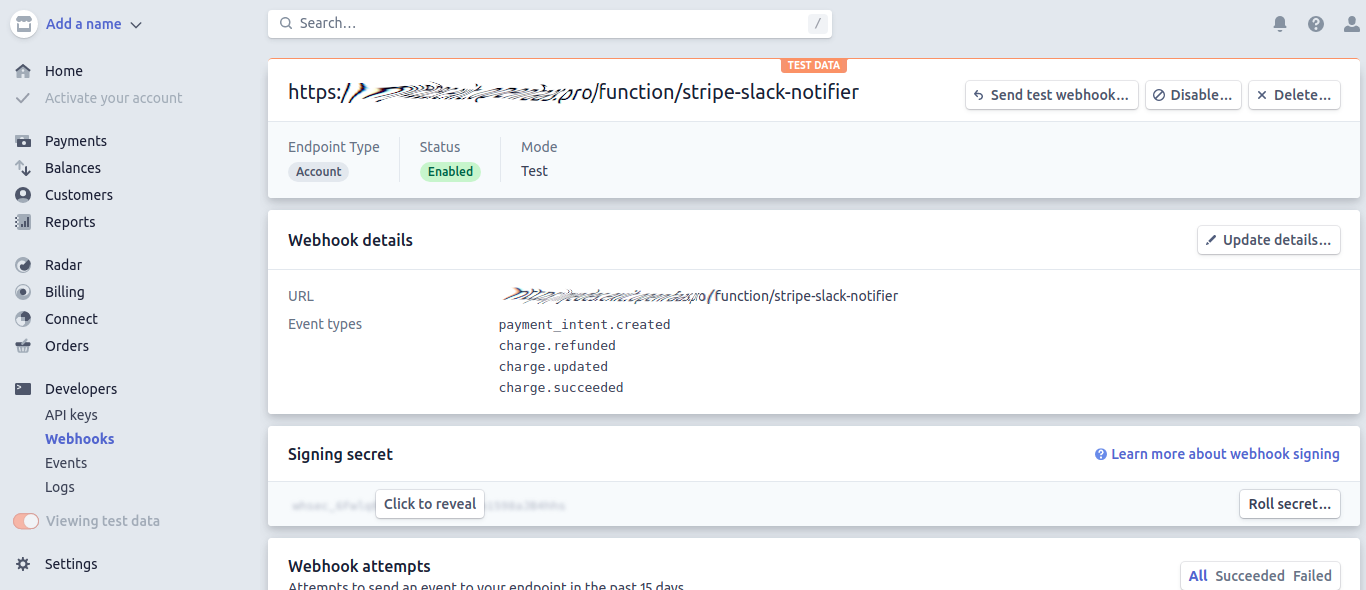
Add a Stripe Webhook
We need to add a new Stripe webhook using the
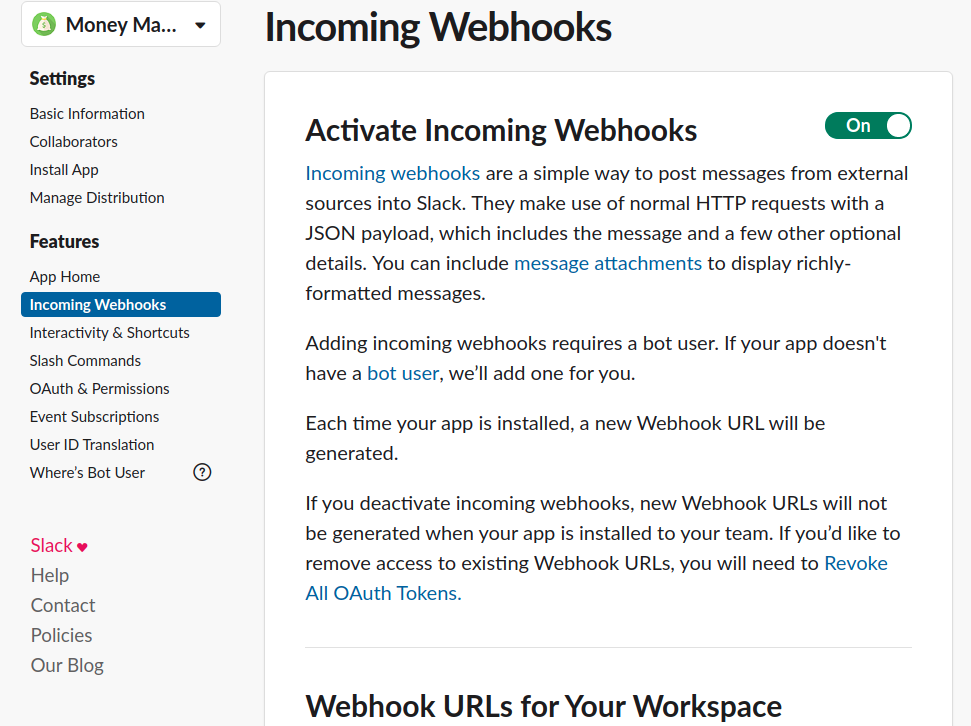
Create a Slack App
To receive incoming webhooks we need to create an App in the Slack dashboard.
Create a function to receive webhooks from Stripe
The function stripe-slack-notifier was built using the python3-http template that is available in the OpenFaaS template store.
Creating a new function using faas-cli new
$ faas-cli template store list | grep python3-http
python3-http             openfaas-incubator Python 3.6 with Flask and HTTP
$ faas-cli template store pull python3-http

# Make sure to set this to you Docker hub username
$ export DOCKER_REGISTRY_PREFIX=<Docker hub username>

$ faas-cli new stripe-slack-notifier --lang python3-http --prefix ${DOCKER_REGISTRY_PREFIX}
Folder: stripe-slack-notifier created.
  ___                   _____           ____
 / _ \ _ __   ___ _ __ |  ___|_ _  __ _/ ___|
| | | | '_ \ / _ \ '_ \| |_ / _` |/ _` \___ \
| |_| | |_) |  __/ | | |  _| (_| | (_| |___) |
 \___/| .__/ \___|_| |_|_|  \__,_|\__,_|____/
      |_|


Function created in folder: stripe-slack-notifier
Stack file written: stripe-slack-notifier.yml
$ tree .
.
├── stripe-slack-notifier
│   ├── handler.py
│   └── requirements.txt
└── stripe-slack-notifier.yml
The final source code for the function can be found in this Github repository:
The function is written in python. It will verify the received payload using the Stripe API key and the webhook singing secret, and then send a slack notification:
import stripe
from babel import numbers
from slack_webhook import Slack

def fetch_secret(secret_name):
    secret_file = open(f"/var/openfaas/secrets/{secret_name}", 'r')
    return secret_file.read()


def handle(event, context):

    # Make sure to create the secrets below
    webhook_url = fetch_secret("slack-webhook-url")
    stripe.api_key = fetch_secret("stripe-secret-key")
    webhook_secret = fetch_secret("webhook-secret")

    payload = event.body
    received_sig = event.headers.get("Stripe-Signature", None)

    try:
        event = stripe.Webhook.construct_event(
            payload, received_sig, webhook_secret
        )
    except ValueError:
        print("Error while decoding event!")
        return {
            "body": "Bad payload",
            "statusCode": 400
        }
    except stripe.error.SignatureVerificationError:
        print("Invalid signature!")
        return {
            "body": "Bad signature",
            "statusCode": 400
        }

    # Fail for all other event types
    if event.type != "charge.succeeded":
        return {
            "body":"Unsupported event type",
            "statusCode": 422
        }

    amount = numbers.format_currency(
      event.data.object.amount / 100,
      event.data.object.currency.upper(),
      locale='en'
    )

    try:
        slack = Slack(url=webhook_url)
        slack.post(text=f"You have a received a new payment of {amount} :moneybag: :tada:")
    except:
        print("An error occured when trying to send slack message.")
        return {
            "body": "Could not send slack message",
            "statusCode": 500
        }
    return {
        "body": "Notification was sent successfully to Slack",
        "statusCode": 200
}OpenFaaS are used to pass the following data to the function:
- Stripe API key
- Webhook signing secret
- Slack Webhook URL
So they need to be created manually with faas-cli before deploying the function:
$ faas-cli secret create slack-webhook-url \
  --from-literal=${SLACK_WEBHOOK_URL} --gateway http://raspberrypi.loc:8080
$ faas-cli secret create stripe-secret-key \
  --from-literal=${STRIPE_API_KEY} --gateway http://raspberrypi.loc:8080
$ faas-cli secret create webhook-secret \
  --from-literal=${WEBHOOK_SIGNING_SECRET} --gateway http://raspberrypi.loc:8080
$ faas-cli secret list --gateway http://raspberrypi.loc:8080

NAME
slack-webhook-url
stripe-secret-key
webhook-secret
Building & deploying the function
Since the function will be running on Raspberry Pi, we need to build the Docker image for armv7.
Fortunately, this has become easier with the multi platform builds feature by available in docker v19.03.
But since we have already exposed our OpenFaaS gateway using inlets, we can use Github Actions to build and deploy the latest version of our function to the Raspberry Pi with every git push. The workflow file used to automate this can be found .
Manually, this can be achieved with the following steps:
- Generate the Docker build context for the function
$ faas-cli build --shrinkwrap -f stripe-slack-notifier.yml2. This step is not needed if using Docker for desktop as this would be done automatically for you. On Linux, we need to register other platforms like armv7 with the kernel using the docker/binfmt image:
$ docker run --privileged --rm docker/binfmt:a7996909642ee92942dcd6cff44b9b95f08dad643. Create a new builder for buildx
$ docker buildx create --name armhf --platform linux/arm/v7
armhf

$ docker buildx ls
NAME/NODE DRIVER/ENDPOINT             STATUS  PLATFORMS
armhf *   docker-container
  armhf0  unix:///var/run/docker.sock running linux/arm/v7, linux/amd64, linux/arm64, linux/riscv64, linux/ppc64le, linux/s390x, linux/386, linux/arm/v7, linux/arm/v6
default   docker
  default default                     running linux/amd64, linux/386
4. Finally build and push the image for both armv7 and amd64 platforms:
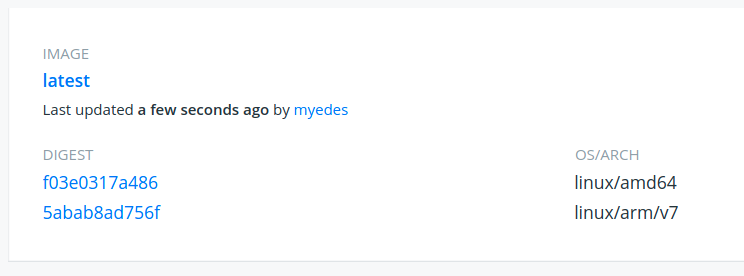
$ DOCKER_BUILD_KIT=1 DOCKER_CLI_EXPERIMENTAL=enabled docker buildx build --platform linux/arm/v7,linux/amd64 -t ${DOCKER_REGISTRY_PREFIX}/stripe-slack-notifier:latest --push .A new Docker image is now available on the Docker registry for both amd64 and armv7 architectures:
To deploy the function to the Raspberry Pi, we can finally run the command below from our laptop:
$ faas-cli deploy -f stripe-slack-notifier.yml -g https://raspberrypi.loc:8080 Test the function
Check the status of the function with faas-cli describe
$ faas-cli describe stripe-slack-notifier --gateway http://raspberrypi.loc:8080
Name:                stripe-slack-notifier
Status:              Ready
Replicas:            1
Available replicas:  1
Invocations:         0
Image:
Function process:
URL:                 http://raspberrypi.loc:8080/function/stripe-slack-notifier
Async URL:           http://raspberrypi.loc:8080/async-function/stripe-slack-notifier
We can test that it's now by triggering some test events from the Stripe dashboard:

After a few moments, we can see a similar message in Slack:

The function only supportscharge.succeededStripe events for now, so any other type of event will receiveUnsupported event typeerror from the function, and no Slack messages will be sent.
Conclusion
In this blog post, I have described how we can create a serverless handler for Stripe API events using and .
As we have seen in this post, faasd can be a great alternative to running OpenFaaS without the need for managing a Kubernetes or Docker Swarm cluster. Combined with inlets, they can be used together for running and exposing functions for real-world use cases.
Things that you might want to do next:
- Join the OpenFaaS community on
- Extend the function to support other webhook event types
- Build a faasd serverless appliance on a cloud instance using cloud-init (see )
- Try out the for getting public IP addresses for your local kubernetes cluster
Function-as-a-Service (FaaS) is a serverless computing method that consists on running applications' logic in stateless, ephemeral containers that are triggered by specific events which may last only for one invocation; and are popular implementations of FaaS.
is a serverless computing framework has been getting a lot of traction in the Open Source community. It allows you to easily build your own FaaS serverless computing platform on top of or , while also providing you with the tools necessary for building your functions.
makes it possible to run OpenFaaS without the need for a container orchestration engine by relying on , which makes it ideal for a building a serverless home lab that doesn't require much computing resources; perfect for single board computers like Raspberry Pi.
In this blog post, I am going to describe how you can build your own OpenFaaS serverless platform by installing faasd on a single Raspberry Pi, and how you can build and deploy you first function to OpenFaas.
Installing dependencies
First, ssh into your Raspberry Pi to install a few dependencies:
sudo apt update \
	&& sudo apt install -qy git runc bridge-utils
Install containerd
Since the Rapsberry Pi has an armv7 architecture
pi@raspberrypi:~ $ uname -m
armv7l
we cannot use the released by the containerd maintainers as they are only compatible with the x86_64.
So in order to install containerd, we can either:
- build the binaries on the Raspberry Pi by following the instructions available
OR - use the pre-built binaries that was kind enough to provide in his
Let's start by downloading the containerd binaries
pi@raspberrypi:~ $ curl -sSL https://github.com/alexellis/containerd-armhf/releases/download/v1.3.2/containerd.tgz | sudo tar -xvz --strip-components=2 -C /usr/local/bin/
./bin/containerd-shim-runc-v1
./bin/containerd-stress
./bin/ctr
./bin/containerd
./bin/containerd-shim-runc-v2
./bin/containerd-shim
Get the containerd systemd unit file
pi@raspberrypi:~ $ sudo wget --output-document=/etc/systemd/system/containerd.service https://raw.githubusercontent.com/containerd/containerd/v1.3.2/containerd.service--2020-02-09 16:44:04--  https://raw.githubusercontent.com/containerd/containerd/v1.3.2/containerd.service

2020-02-09 16:44:04 (6.45 MB/s) - ‘/etc/systemd/system/containerd.service’ saved [641/641]
Start containerd and enable it at system startup
pi@raspberrypi:~ $ sudo systemctl enable containerd
Created symlink /etc/systemd/system/multi-user.target.wants/containerd.service → /etc/systemd/system/containerd.service.
pi@raspberrypi:~ $ sudo systemctl start containerd.service
pi@raspberrypi:~ $ systemctl status containerd.service
● containerd.service - containerd container runtime
   Loaded: loaded (/etc/systemd/system/containerd.service; enabled; vendor preset: enabled)
   Active: active (running) since Sun 2020-02-09 16:45:32 CET; 47s ago
     Docs: https://containerd.io
  Process: 2763 ExecStartPre=/sbin/modprobe overlay (code=exited, status=0/SUCCESS)
 Main PID: 2764 (containerd)
    Tasks: 13
   Memory: 19.2M
   CGroup: /system.slice/containerd.service
           └─2764 /usr/local/bin/containerd
Setup container networking
We need to enable the Linux kernel bridge modules and IPv4 forwarding as follows:
pi@raspberrypi:~ $ sudo modprobe br_netfilter
pi@raspberrypi:~ $ sudo sysctl net.bridge.bridge-nf-call-iptables=1
net.bridge.bridge-nf-call-iptables = 1
pi@raspberrypi:~ $ sudo /sbin/sysctl -w net.ipv4.conf.all.forwarding=1
We also need to install the CNI networking plugins using the commands below:
pi@raspberrypi:~ $ sudo mkdir -p /opt/cni/bin
pi@raspberrypi:~ $ curl -sSL https://github.com/containernetworking/plugins/releases/download/v0.8.5/cni-plugins-linux-arm-v0.8.5.tgz | sudo tar -xz -C /opt/cni/bin
pi@raspberrypi:~ $ ls -l /opt/cni/bin/
total 64436
-rwxr-xr-x 1 root root  3775719 Jan 22 19:52 bandwidth
-rwxr-xr-x 1 root root  4255875 Jan 22 19:52 bridge
-rwxr-xr-x 1 root root 10706922 Jan 22 19:52 dhcp
-rwxr-xr-x 1 root root  5394554 Jan 22 19:52 firewall
-rwxr-xr-x 1 root root  2872015 Jan 22 19:52 flannel
-rwxr-xr-x 1 root root  3843695 Jan 22 19:52 host-device
-rwxr-xr-x 1 root root  3359276 Jan 22 19:52 host-local
-rwxr-xr-x 1 root root  3976434 Jan 22 19:52 ipvlan
-rwxr-xr-x 1 root root  3015277 Jan 22 19:52 loopback
-rwxr-xr-x 1 root root  4046458 Jan 22 19:52 macvlan
-rwxr-xr-x 1 root root  3637166 Jan 22 19:52 portmap
-rwxr-xr-x 1 root root  4187702 Jan 22 19:52 ptp
-rwxr-xr-x 1 root root  3152425 Jan 22 19:52 sbr
-rwxr-xr-x 1 root root  2665626 Jan 22 19:52 static
-rwxr-xr-x 1 root root  3087310 Jan 22 19:52 tuning
-rwxr-xr-x 1 root root  3976306 Jan 22 19:52 vlan
Install faasd
Install faas-cli
Before installing faasd, let's install . faas-cli is the command line utility that can be used to interact with OpenFaaS and allows us to build and deploy functions.
pi@raspberrypi:~ $ curl -sLfS https://cli.openfaas.com | sudo sh
armv7l
Downloading package https://github.com/openfaas/faas-cli/releases/download/0.11.7/faas-cli-armhf as /tmp/faas-cli-armhf
Download complete.

Running with sufficient permissions to attempt to move faas-cli to /usr/local/bin
New version of faas-cli installed to /usr/local/bin
Creating alias 'faas' for 'faas-cli'.
  ___                   _____           ____
 / _ \ _ __   ___ _ __ |  ___|_ _  __ _/ ___|
| | | | '_ \ / _ \ '_ \| |_ / _` |/ _` \___ \
| |_| | |_) |  __/ | | |  _| (_| | (_| |___) |
 \___/| .__/ \___|_| |_|_|  \__,_|\__,_|____/
      |_|

CLI:
 commit:  30b7cec9634c708679cf5b4d2884cf597b431401
 version: 0.11.7
You can also enable bash-completion for faas-cli using the command below:
pi@raspberrypi:~ $ source <(faas-cli completion --shell bash)Install faasd
Let's fetch the latest faasd binary using the following command
pi@raspberrypi:~ $ sudo wget --output-document=/usr/local/bin/faasd https://github.com/openfaas/faasd/releases/download/0.7.4/faasd-armhf && sudo chmod +x /usr/local/bin/faasd

2020-02-09 17:10:19 (662 KB/s) - ‘/usr/local/bin/faasd’ saved [14548992/14548992]

pi@raspberrypi:~ $ faasd version
  __                     _
 / _| __ _  __ _ ___  __| |
| |_ / _` |/ _` / __|/ _` |
|  _| (_| | (_| \__ \ (_| |
|_|  \__,_|\__,_|___/\__,_|

faasd
Commit: 592f3d3cc073ca6af83fac3013cc2f4743d05e52
Version: 0.7.4
Now we just need to run the faasd installation:
pi@raspberrypi:~ $ export GOPATH=$HOME/go/
pi@raspberrypi:~ $ mkdir -p $GOPATH/src/github.com/openfaas
pi@raspberrypi:~ $ cd $GOPATH/src/github.com/openfaas
pi@raspberrypi:~/go/src/github.com/openfaas $ git clone https://github.com/openfaas/faasd.git
pi@raspberrypi:~/go/src/github.com/openfaas $ cd faasd/
pi@raspberrypi:~/go/src/github.com/openfaas/faasd $ sudo faasd install
Login with:
  sudo cat /var/lib/faasd/secrets/basic-auth-password | faas-cli login -s
And finally, as mentioned in the command output, login using faas-cli to be able to interact with your new OpenFaaS installation:
pi@raspberrypi:~ $ sudo cat /var/lib/faasd/secrets/basic-auth-password | faas-cli login -s
Calling the OpenFaaS server to validate the credentials...
WARNING! Communication is not secure, please consider using HTTPS. Letsencrypt.org offers free SSL/TLS certificates.
credentials saved for admin http://127.0.0.1:8080
Access the OpenFaaS interface
Once faasd is setup and running, the OpenFaaS user interface can be accessed on your browser at http://RASPBERRYPI_IP:8080. Since it is protected by basic auth, you would need to use the username and password available under /var/lib/faasd/secrets/basic-auth-password and /var/lib/faasd/secrets/basic-auth-user to login.
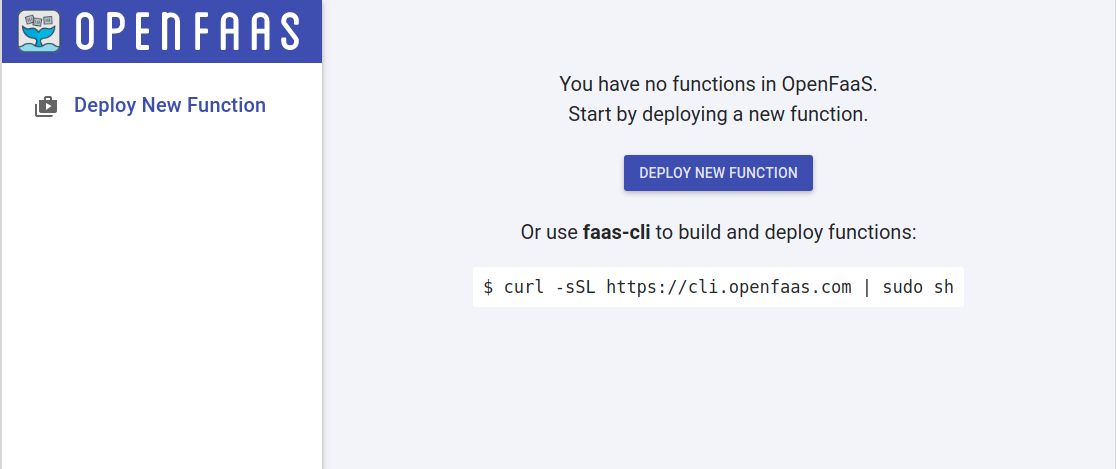
Once logged in, you will be greeted with the following interface:
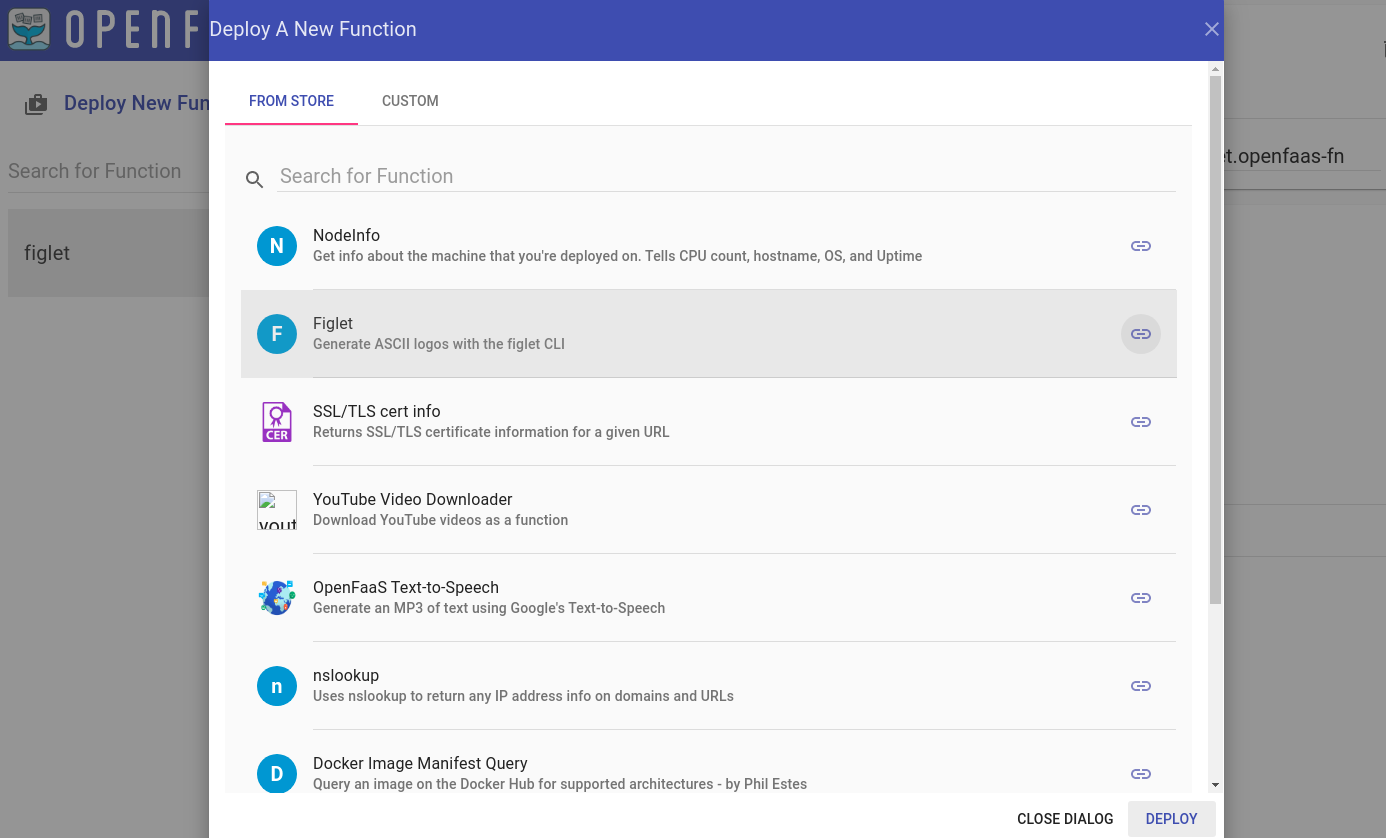
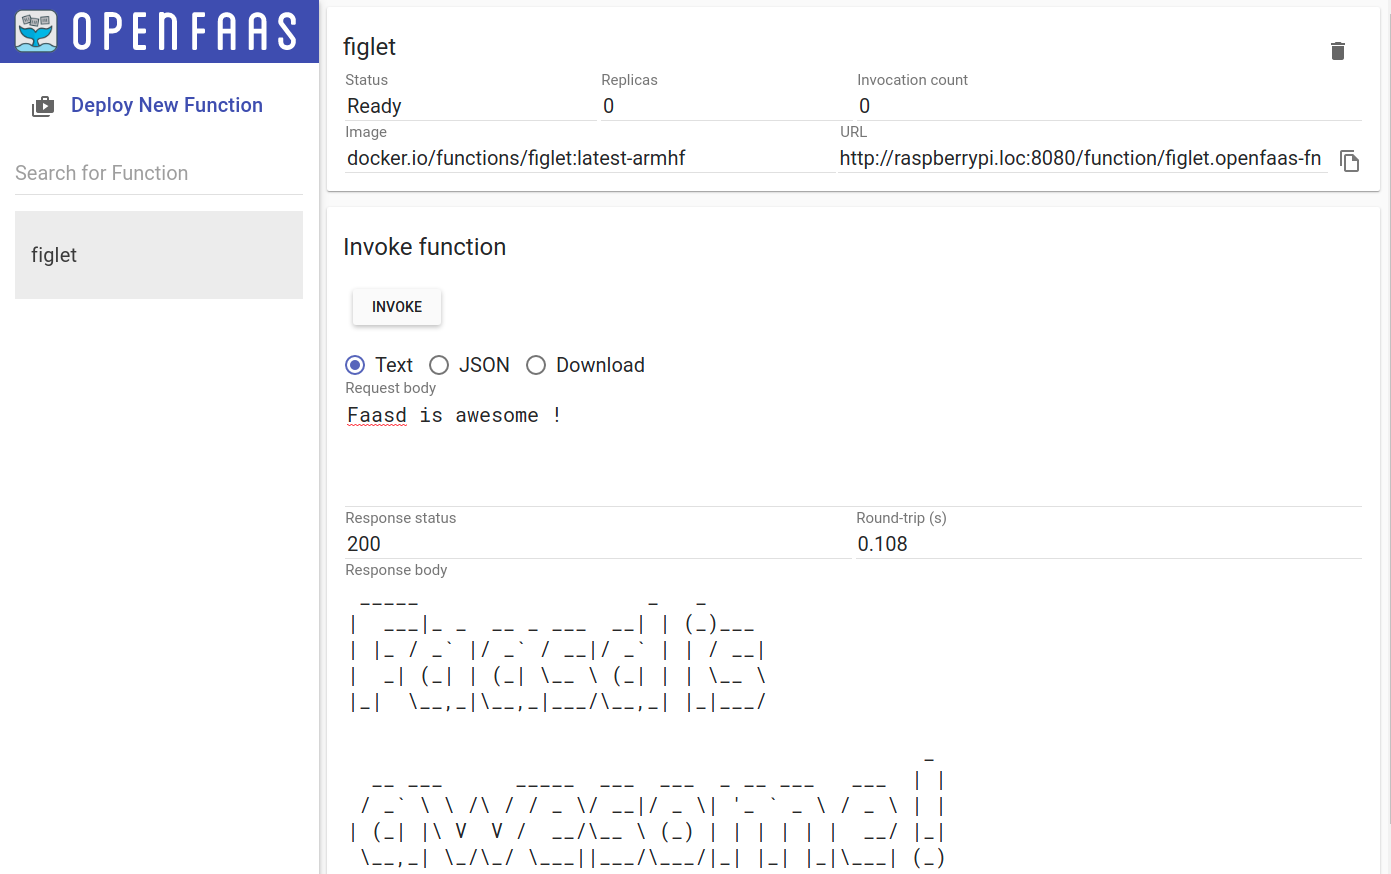
There are a few functions already available at the OpenFaas store, that you can easily deploy directly from the web user interface. Let's try deploying the figlet function:
Once the status of the function is Ready, let's try to invoke it:
Using faas-cli
Let's use faas-cli now to interact with the OpenFaas gateway. First, we need to login to the OpenFaas gateway using the faas login command from our workstation.
Fetch the password from the /var/lib/faasd/secrets/basic-auth-password file on the Raspberry Pi and store it in a file on your workstation because it's required for the login. Here, I have stored the password in the ~/.faas_pass file:
$ cat ~/.faas_pass | faas login -s --gateway http://raspberrypi.loc:8080
Calling the OpenFaaS server to validate the credentials...
WARNING! Communication is not secure, please consider using HTTPS. Letsencrypt.org offers free SSL/TLS certificates.
credentials saved for admin http://raspberrypi.loc:8080
We can list and inspect the deployed functions using the commands below:
$ faas list --gateway http://raspberrypi.loc:8080
Function                      	Invocations    	Replicas
figlet                        	1              	1

$ faas describe --gateway http://raspberrypi.loc:8080 figlet
Name:                figlet
Status:              Ready
Replicas:            1
Available replicas:  1
Invocations:         1
Image:
Function process:
URL:                 http://raspberrypi.loc:8080/function/figlet
Async URL:           http://raspberrypi.loc:8080/async-function/figlet
Using faas-cli to deploy a function from the store
We can list the available function in the OpenFaas store for the armhf platform using the command below:
$ faas store list --platform armhf

FUNCTION                    DESCRIPTION
NodeInfo                    Get info about the machine that you...
Figlet                      Generate ASCII logos with the figlet CLI
SSL/TLS cert info           Returns SSL/TLS certificate informati...
YouTube Video Downloader    Download YouTube videos as a function
OpenFaaS Text-to-Speech     Generate an MP3 of text using Google'...
nslookup                    Uses nslookup to return any IP addres...
Docker Image Manifest Query Query an image on the Docker Hub for ...
Left-Pad                    left-pad on OpenFaaS
Identicon Generator         Create an identicon from a provided s...
Let's deploy the nslookup function using the faas store deploy command:
$ faas store deploy --platform armhf --gateway http://raspberrypi.loc:8080 nslookup
WARNING! Communication is not secure, please consider using HTTPS. Letsencrypt.org offers free SSL/TLS certificates.

Deployed. 200 OK.
URL: http://raspberrypi.loc:8080/function/nslookup

$ faas describe nslookup --gateway http://raspberrypi.loc:8080
Name:                nslookup
Status:              Ready
Replicas:            1
Available replicas:  1
Invocations:         0
Image:
Function process:
URL:                 http://raspberrypi.loc:8080/function/nslookup
Async URL:           http://raspberrypi.loc:8080/async-function/nslookup
Let's invoke our new function from the command line:
$ echo "openfaas.com" | faas invoke nslookup --gateway http://raspberrypi.loc:8080
nslookup: can't resolve '(null)': Name does not resolve

Name:      openfaas.com
Address 1: 185.199.108.153
Address 2: 185.199.111.153
Address 3: 185.199.109.153
Address 4: 185.199.110.153
Voila! We have deployed and tested our first function from the command line. 🎉
Build your own function
What if we want to build a new function ourserlves, and deploy it to OpenFaas on the Raspberry PI?faas-cli offers a convenient way to achieve this, as it provides templates for multiple programming languages and commands that allow us to and deploy new functions to OpenFaas.
However, since we don't have Docker installed on the Rapsberry Pi, we would need to build our functions using another tool: .
Download buildkit binaries
Since buildkit binaries for armv7 are already available on the project's Github repository, we won't need to compile them by ourselves. Let's fetch the latest buildkit binaries on the RPi:
pi@raspberrypi:~ $ wget -qO- https://github.com/moby/buildkit/releases/download/v0.6.4/buildkit-v0.6.4.linux-arm-v7.tar.gz | sudo tar -xz -C /usr/local/bin/ --strip-components=1
pi@raspberrypi:~ $ /usr/local/bin/buildkitd --version
buildkitd github.com/moby/buildkit v0.6.4 ebcef1f69af0bbca077efa9a960a481e579a0e89
pi@raspberrypi:~ $ /usr/local/bin/buildctl --version
buildctl github.com/moby/buildkit v0.6.4 ebcef1f69af0bbca077efa9a960a481e579a0e89
Build a new function
We are going to build a small function in golang and deploy it to OpenFaas.
Luckily, we don't have to do everything from scratch. We can use one of the already available templates from the OpenFaas template store.
We can list the templates available for the armhf platform using the command below:
pi@raspberrypi:~ $ faas template store list --platform armhf

NAME                    SOURCE             DESCRIPTION
dockerfile-armhf        openfaas           Classic Dockerfile armhf template
go-armhf                openfaas           Classic Golang armhf template
node-armhf              openfaas           Classic NodeJS 8 armhf template
python-armhf            openfaas           Classic Python 2.7 armhf template
python3-armhf           openfaas           Classic Python 3.6 armhf template
node10-express-armhf    openfaas-incubator Node.js 10 powered by express armhf template
python3-flask-armhf     openfaas-incubator Python 3.6 Flask armhf template
python3-http-armhf      openfaas-incubator Python 3.6 with Flask and HTTP for ARMHF
node8-express-armhf     openfaas-incubator Node.js 8 powered by express armhf template
golang-http-armhf       openfaas-incubator Golang HTTP armhf template
golang-middleware-armhf openfaas-incubator Golang Middleware armhf template
We're going to use the classic golang template here, so let's create a new function:
pi@raspberrypi:~ $ mkdir ~/openfaas && cd ~/openfaas
pi@raspberrypi:~/openfaas $ faas new hello-go --lang go-armhf --prefix myedes
Folder: hello-go created.
  ___                   _____           ____
 / _ \ _ __   ___ _ __ |  ___|_ _  __ _/ ___|
| | | | '_ \ / _ \ '_ \| |_ / _` |/ _` \___ \
| |_| | |_) |  __/ | | |  _| (_| | (_| |___) |
 \___/| .__/ \___|_| |_|_|  \__,_|\__,_|____/
      |_|


Function created in folder: hello-go
Stack file written: hello-go.yml

Notes:
You have created a new function which uses Golang 1.11
To include third-party dependencies, use a vendoring tool like dep:
dep documentation: https://github.com/golang/dep#installation

You may also like the golang-middleware and golang-http templates
available via "faas-cli template store"
The --prefix option allows you to specify a custom docker registry used to pushing and pulling the function's image.
The template we have used consists of a simple go function that returns a text message along with the request body. The logic can be found inside the hello-go/handler.go file:
pi@raspberrypi:~/openfaas $ cat hello-go/handler.go
package function

import (
	"fmt"
)

// Handle a serverless request
func Handle(req []byte) string {
	return fmt.Sprintf("Hello, Go. You said: %s", string(req))
}
Using the --shrinkwrap option, we can generate the build context for our function without actually building our function's image. This is useful when we want to use a different tool for building our image, in our case buildkit:
pi@raspberrypi:~/openfaas $ faas build -f hello-go.yml --shrinkwrap
[0] > Building hello-go.
Clearing temporary build folder: ./build/hello-go/
Preparing: ./hello-go/ build/hello-go/function
Building: docker.io/myedes/hello-go:latest with go-armhf template. Please wait..
hello-go shrink-wrapped to ./build/hello-go/
[0] < Building hello-go done in 0.01s.
[0] Worker done.

Total build time: 0.01s
As we can see, the command generated a few files inside the build/ folder; our build context:
build/
└── hello-go
    ├── Dockerfile
    ├── function
    │   └── handler.go
    ├── go.mod
    ├── main.go
    └── template.yml

2 directories, 5 files
Before building our image, we need to configure the authentication to be able to push to the docker registry. However, we cannot use the docker login command since we don't have Docker installed, so we will have to create the ~/.docker/config.json file manually.
For , we need to generate a token from the user interface and then create the ~/.docker/config.json on the RPi as follows:
pi@raspberrypi:~/openfaas $ export DOCKERHUB_USERNAME=myedes
pi@raspberrypi:~/openfaas $ export DOCKERHUB_TOKEN=<PERSONAL ACCESS TOKEN>
pi@raspberrypi:~/openfaas $ export DOCKER_AUTH=$(echo -n "$DOCKERHUB_USERNAME:$DOCKERHUB_TOKEN" | base64)

pi@raspberrypi:~/openfaas $ cat > ~/.docker/config.json << EOF
{
    "auths": {
        "https://index.docker.io/v1/": {
            "auth": "$DOCKER_AUTH"
 		}
 	}
}
EOF
Let's start the buildkitd daemon in the background, and then start the build:
# Run the buildkitd daemon
pi@raspberrypi:~/openfaas $ sudo /usr/local/bin/buildkitd &
[1] 15587

# Build and push the function image to hub.docker.com
pi@raspberrypi:~/openfaas $ sudo buildctl build \
	--frontend dockerfile.v0 \
    --local context=build/hello-go/ \
    --local dockerfile=build/hello-go/ \
    --output type=image,name=docker.io/myedes/hello-go:latest,push=true

[+] Building 81.3s (26/26) FINISHED
...
 => => pushing layers
 => => pushing manifest for docker.io/myedes/hello-go:latest
For more information about how to use buildkit, make sure to check out the Github repository.Deploy the function
As we have built and pushed the function's image to the registry, we can now go ahead and deploy our new function to our OpenFaas gateway:
pi@raspberrypi:~/openfaas $ faas deploy -f hello-go.yml
Deploying: hello-go.
WARNING! Communication is not secure, please consider using HTTPS. Letsencrypt.org offers free SSL/TLS certificates.

Deployed. 200 OK.
URL: http://127.0.0.1:8080/function/hello-go
By inspecting our new function, we can see that it's in a "Ready" state:
pi@raspberrypi:~/openfaas $ faas describe hello-go
Name:                hello-go
Status:              Ready
Replicas:            1
Available replicas:  1
Invocations:         0
Image:
Function process:
URL:                 http://127.0.0.1:8080/function/hello-go
Async URL:           http://127.0.0.1:8080/async-function/hello-go
We can now invoke it using the faas invoke command from the Raspberry Pi:
pi@raspberrypi:~/openfaas $ echo "Hello OpenFaas" | faas invoke hello-go
Hello, Go. You said: Hello OpenFaas
or from our workstation, but we need to specify the gateway using the --gateway parameter:
$ echo "Hello from laptop" | faas invoke --gateway http://raspberrypi.loc:8080 hello-go

Hello, Go. You said: Hello from laptop
And that's it, we have built and deployed our first function to OpenFaas running on a single Raspberry PI 🎉 Pretty cool isn't it?
Conclusion
In this blog post, we have gone through how we can run a FaaS serverless platform based on OpenFaas on a Raspberry Pi board, and how to build and deploy a simple function.
Although faasd is still a bit limited in its features compared to OpenFaas, it is very useful for small setups like home labs especially that there is no need to maintain a Kubernetes or Docker Swarm cluster
Finally, kudos to and the OpenFaas team for this awesome project!
References:
Finishing the year as a Certified Kubernetes Administrator(CKA) was my personal goal for 2019, and I was able to take the exam around the end of the year and pass with a score of 91%. 🎉
In this blog post, I wanted to share some useful resources that helped me pass the CKA exam, and a few tips that can help you prepare and hopefully pass if you are also planning to take it.
DISCLAIMER: This post is a bit long because I tried to dump all the knowledge and experience I gathered when preparing for the CKA exam. So brace yourself 😀
The Certified Kubernetes Administrator Exam
With the exploding adoption of Kubernetes, the program was created by the (CNCF) in collaboration with the Linux Foundation to allow Kubernetes users to demonstrate that they have the necessary skills and knowledge to perform the tasks and responsibilities of a Kubernetes administrator.
The exam's format
The good thing about it is that it's 100% hands-on. It's an online proctored exam where you are asked to perform certain tasks on the command line.
The is your definitive source for any details about the exam. So make sure to read it thoroughly.
Here is a short list of points worth mentioning:
- You need a steady internet connection.
- You would need a webcam and a microphone which are required by the proctor.
- You would need a government issued ID, or a passport.
- The exam consists of 24 questions that you can solve in no specific order.
- The duration of the exam is 3 hours.
- The pass mark is 74%.
- You need to use the Chrome browser.
- You have one free retake in case you don't pass on your first try 🎉
The curriculum
Unlike the Certified (CKAD) exam, the CKA exam focuses more on cluster administration rather than deploying and managing applications on Kubernetes.
The exam's curriculum is usually updated quarterly, you can always find the latest version at:
The CKA exam covers the following topics:
- Application Lifecycle Management – 8%
- Installation, Configuration & Validation – 12%
- Core Concepts – 19%
- Networking – 11%
- Scheduling – 5%
- Security – 12%
- Cluster Maintenance – 11%
- Logging / Monitoring – 5%
- Storage – 7%
- Troubleshooting – 10%
The exam environment
The day of the exam, you will have multiple cluster presented for you, and with each question you will be provided with name of the cluster where you should try to solve the question.
Below is the list of the clusters provided to the candidate from the latest document available at the CKA CNCF page at the time of writing this post:
| Cluster | Members | CNI | Description |
|---|---|---|---|
| k8s | 1 master, 2 workers | flannel | k8s cluster |
| hk8s | 1 master, 2 workers | calico | k8s cluster |
| bk8s | 1 master, 1 worker | flannel | k8s cluster |
| wk8s | 1 master, 2 workers | flannel | k8s cluster |
| ek8s | 1 master, 2 workers | flannel | k8s cluster |
| ik8s | 1 master, 1 base node | loopback | k8s cluster - missing worker node |
The Kubernetes version running on the exam environment is currently v1.16 at the time of writing this post, and the Linux distribution is Ubuntu 16.
Preparing for the exam
The first step in preparing for the CKA exam(or any exam) is understanding what it is about.
So make sure to read all the documents provided in the CKA Program page at :
Pre-requisites
Although the CKA exam is about Kubernetes, it also requires some basic sysadmin skills. So, you need be comfortable with the Linux command line and have a minimum knowledge on how to use the following tools:
systemdfor managing system services. Basic knowledge would be enough IMHO, but very important especially for troubleshooting cluster components. There is a nice tutorial series for that provided by the DigitalOcean people:
vimfor editing files on the command line. Although you could change the default text editor by setting the value of$EDITORto nano if that's what you are most comfortable with, vim can give you a productive boost during the exam.tmuxsince you only get one console during the exam, being able to have multiple panes open at the same time might be helpful. Personally, I didn't really need or use tmux during the exam, so if you don't use it already in your day to day work, I don't recommend learning it for the sake of the exam.opensslfor generating keys, CSRs, certificates etc.. You will probably need it during the exam for security related questions. So make sure you train yourself to use it at least for those basic use cases.
Getting ready for the exam
In this section, I am going to provide some tips on how to prepare for the exam and also list some useful resources that helped me and might help you get fit for the exam day.
kubectl
Since the CKA exam is 100% practical, you need to make sure you are confident enough with kubectl. That's mostly what you will be using during the exam, and since you are already reading this post, chances are you are already using kubectl or at least experimenting with it.
You need to be quick on the command line since you will have limited time for solving the questions during the exam, so knowing how to perform the following quickly with kubectl is crucial:
- Checking the config, switching and creating contexts
- Creating, editing and deleting kubernetes resources
- Viewing, finding and inspecting resources
- Updating and patching resources
- Interacting with pods, nodes and cluster
A lot of useful kubectl command examples can be found in the available in the official kubernetes documentation.
It is also very useful to know how to use the kubectl run command to create resources quickly, saving time by avoiding to write yaml files(who likes that, right?). You can also use it to generate yaml files if you need to edit something before actually creating the kubernetes object by using the --dry-run and the -o yaml options combined. Some details about the kubectl run usage can be found .
If you come from the Docker world and still starting with Kubernetes, then the documentation page is definitely worth checking out.
Getting familiar with template would be also helpful. Combining kubectl and jsonpath enables you to easily extract resource information in a format that you can specify.
Finally, make sure to practice a lot with kubectl, whether it is on local kubernetes clusters with minikube, docker-desktop or on the cloud. That is very crucial for the exam.
Learning resources
If you are planning to take the CKA exam, them you probably have already searched around the internet for some resources and found plenty. So in this section, I am only going to list the resources that I have found most informative and helpful for me to pass the exam.
The Kubernetes Documentation
The most important resource is the ; that's your definitive source of information. And since you are allowed to access it during the exam, it's really important that you know how to easily navigate it and quickly search for what you need. Make sure to get well accustomed to it.
Also, make sure you get to do most if not all of the tasks listed .
It's really useful to join the kubernetes slack community at . There is a slack channel dedicated to CKA exam questions named #cka-exam-prep.
The members there are really nice and helpful and would answer any questions you have.
Kubernetes The Hard Way(KTHW)
The repo was created by Kelsey Hightower to provide a guide for bootstrapping a Kubernetes cluster on Google Cloud Platform. It helps you understand the internals of a Kubernetes cluster, which would be really important especially for troubleshooting.
Make sure to go through it at least once while trying to understand every step on the way.
If you don't want to use GCP, there is another fork that relies on vagrant and can be found here:
Online Courses
There are a couple of online course available that can help you prepare for the CKA exam.
I was able to try 3 of them while preparing for the exam:
- which was part of the CKA exam bundle I purchased.
I only liked the practice labs, otherwise the course was very boring and you'd better read the kubernetes documentation rather than reading slides. So IMHO totally not worth taking. - :
I found this course really good at first. However, after a while I found myself watching the instructor mostly typing commands in the terminal so I got disconnected and stopped following the course. I also tried the mock exams, but I found them a bit limited. - Udemy:
This was the most comprehensive course for me in this list. It covered all the topics, and the instructor made sure to explain all the Kubernetes concepts(and also other concepts) thouroughly.
The practice labs are really good since you are provided with an environment and your answers are checked there automatically.
The mock exams were also a great preparation for the exam.
I cannot recommend this course enough!
Additional Resources
The book by Marko Lukša is definitely worth reading to have a good understanding of Kubernetes.
There is a google spreadsheet created by the community that compiles a lot of useful resources that can be found .
Some additional useful Github repositories:
-
-
-
-
Tips for the exam day
In this section, I am going to provide a few tips for the day of the exam:
- You are allowed to open one additional browser tab in addition to the exam interface and you can use it to browse the kubernetes documentation. Bookmarks are also allowed, so make sure to create some bookmarks in chromes for the documentation sections that you think you would need in the exam beforehand.
- You don't have to solve the questions in a specific order. So you can start with the easiest to build some confidence, but that's a matter of personal preference.
- There is built-in notepad in the exam interface which might be handy since you're not allowed to write on paper during the exam. You can use it to write the questions' numbers so that you keep track of the ones you didn't solve and get back to them later.
- If you are taking the exam with a laptop, use an external monitor if your laptop screen is tiny. You would need all the space you can get for the terminal.
- Make sure to go to the restroom before starting the exam. During the 3 hours, you would only be able to take a break if your proctor allows it but the timer would never stop for you.
- Have some water in a bottle without a label, or a transparent glass. Anything other than that is not allowed.
- Take the exam in a quiet room, on a clean desk. Remove any electronics from the desk and make sure that absolutely no one enters the room during the exam.
You will be asked by the proctor to show him around the room using the webcam. - Finally: GOOD LUCK!
Conclusion
In this post, I tried to provide some tips and resources for preparing the CKA exam based on my experience.
I hope this article would be useful for you and please let me know in the comments if it somehow helped you to pass the exam.
]]>In this blog post, I will describe how I set up my blog using:
- : obviously the blogging platform
- : frontend proxy
- : database backend
- 🐋: to run the whole thing
Background
I have been wanting to start my personal blog for a while. And after weighing the pros and cons of the different options, I have finally decided to use Ghost for my personal blog, running on a cloud VM on .
Although offers fully managed Ghost infrastructure, it was too expensive for a personal blog as the pricing starts from 29$/month. Besides, I really like getting my hands dirty so I also opted against using the offered by DigitalOcean.
I have decided to use Docker to run the blog stack (Ghost + MariaDB + Nginx) to be able to spin up the blog easily, and also to be able to replicate the same setup locally or anywhere else when needed.
In order to achieve this, I have created the github repository to make it easier to deploy the blog.
In the course of this post, I will describe how you can use my github repository to easily deploy your Ghost blog.
Preparing the setup
If you are only interested in running Ghost locally for testing/experimenting purposes, skip directly to the "Deploying the Ghost blog" section.
As I mentioned earlier in this post, I have opted for running my blog on a Digitalocean Ubuntu 18.04 VM.
In this section, I will describe the steps that I have followed to prepare my setup, which only costs me around 7$/month including the domain name registration.
Register a domain name
Of course, first you need to choose and register a domain name for your blog. There are multiple domain name registrars to choose from such as , or .
I chose to register my myedes.io domain with because that's where I was able to get a good deal for an .io domain for only 25$/year.
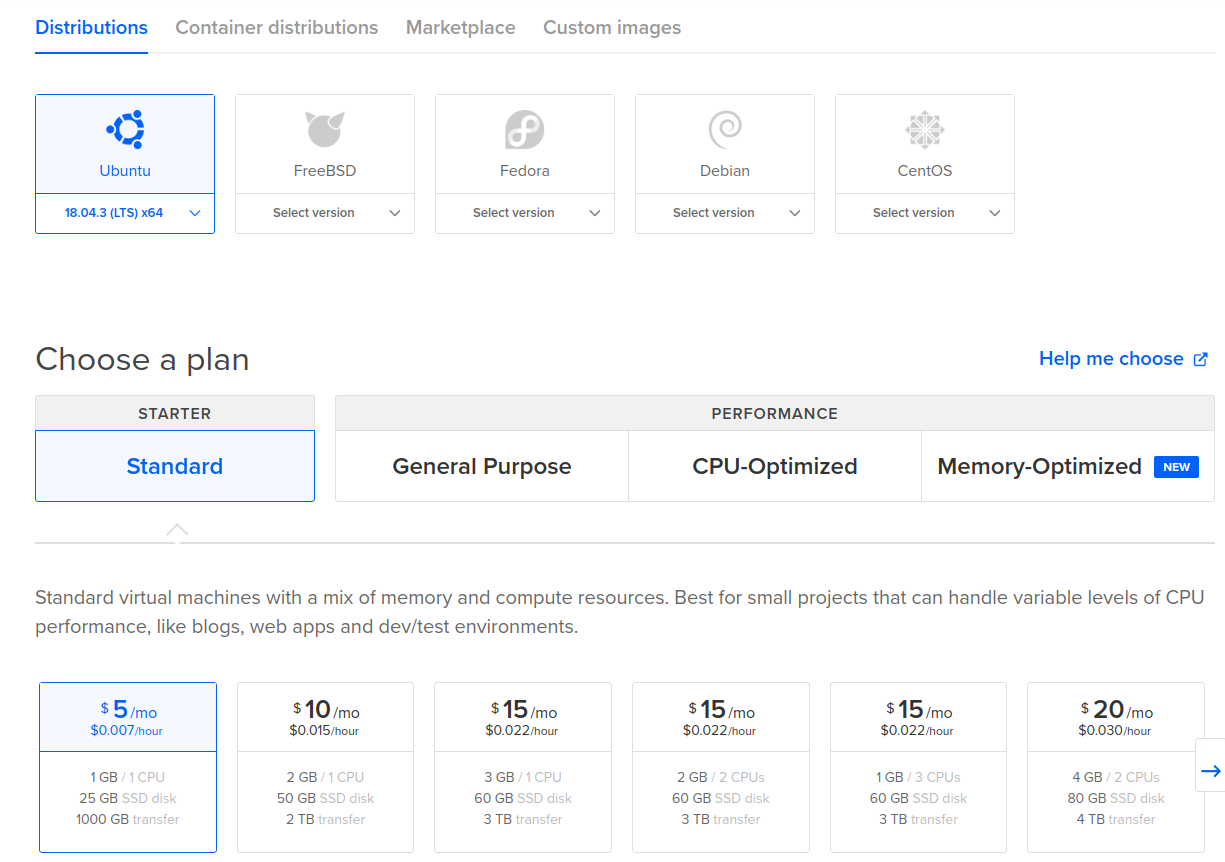
Provision a cloud instance
Since this is just personal blog, I wasn't expecting much traffic so a standard 5$/month instance on Digitalocean would do the job. I chose Ubuntu 18.04 for for the OS, but there shouldn't be much difference when choosing another OS since the setup relies on Docker.
If you choose to use Digitalocean for hosting your blog, you can use this and get 100$ of free credits.
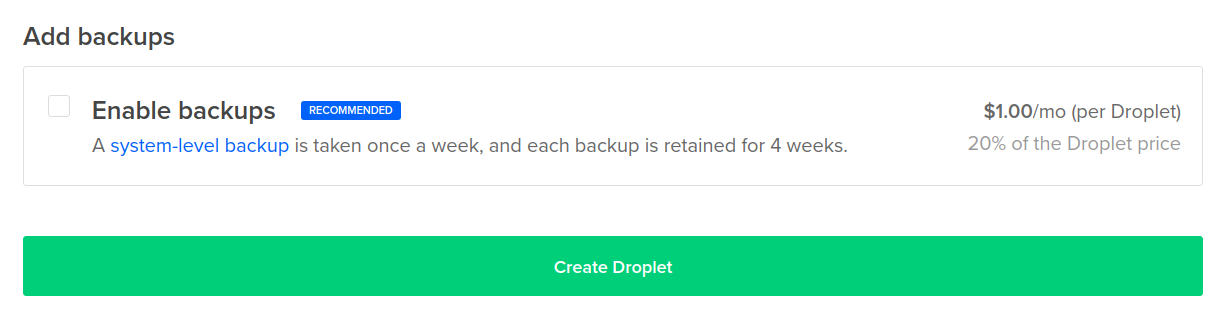
You can also enable backups for your instance for 20% of the price, which would cost around 1$/month for a 5$ droplet.
Point to your cloud provider's name servers
Although you can configure this directly through your domain name registrar using your VM's public IP, it's better to point to the cloud provider's name servers and configure the name resolution there.
For the Namecheap + Digitalocean combination, this can be easily configured as described in the 2 links below:
After that, you can point your domain to your cloud instance directly from your cloud hosting provider's dashboard.
You might need to wait for around 24h for the DNS changes to propagate.
Deploying the Ghost blog
In this section, I will describe how you can use the github repository to deploy Ghost.
Pre-requisites
Since everything will be running on Docker, the only dependencies needed are and which they can be installed using the command below on Ubuntu 18.04:
$ sudo apt install docker.io docker-composeYou also need to make sure that your non-root user (here ubuntu) is in the docker group to be able to run docker commands:
$ sudo usermod ubuntu -aG dockerI used docker-compose here because it offers an easy way to orchestrate the deployment of multiple Docker containers; in this case: ghost, nginx and MariaDB.
Preparing the environment
First, you need to clone the github on your machine:
$ git clone https://github.com/mehyedes/docker-ghost.git
$ cd docker-ghost/The files provided in the github repository contains default configuration which can be used for running ghost locally. However, for running a public blog it must be changed accordingly. In that case, create a .env.prod file and set your configuration there:
# Tag used for the ghost docker image
export GHOST_IMAGE_TAG=3.2.0-alpine

# Tag used for the MariaDB docker image
export MARIADB_IMAGE_TAG=10.4

# Configure the blog url in ghost
export BLOG_URL=http://127.0.0.1

# Root password used for MariaDB
export MYSQL_ROOT_PASSWORD=dummy

# User password used by ghost to connect to the database
export MYSQL_PASSWORD=ghost1234

# Host folders used by the containers
export MYSQL_HOST_PATH=~/mariadb_data
export GHOST_HOST_PATH=~/ghost
export NGINX_HOST_PATH=~/nginx

# Exposed host ports
export NGINX_HTTP_PORT=80
export NGINX_HTTPS_PORT=443The environment variables defined above are used by docker-compose to configure the Docker containers during (re)creation:
 version: '3.3'

services:
  mariadb:
    image: mariadb:${MARIADB_IMAGE_TAG:-10.4}
    environment:
      MYSQL_ROOT_PASSWORD: ${MYSQL_ROOT_PASSWORD:-dummy}
      MYSQL_USER: ghost
      MYSQL_PASSWORD: ${MYSQL_PASSWORD:-ghost1234}
      MYSQL_DATABASE: ghost_production
    restart: always
    volumes:
      - type: bind
        source: ${MYSQL_HOST_PATH:-~/mariadb_data}
        target: /var/lib/mysql

  ghost:
    image: ghost:${GHOST_IMAGE_TAG:-3.2.0-alpine}
    environment:
      url: ${BLOG_URL:-http://127.0.0.1}
      database__client: mysql
      database__connection__host: mariadb
      database__connection__database: ghost_production
      database__connection__user: ghost
      database__connection__password: ${MYSQL_PASSWORD:-ghost1234}
    depends_on:
      - mariadb
    restart: always
    volumes:
      - type: bind
        source: ${GHOST_HOST_PATH:-~/ghost}
        target: /var/lib/ghost/content

  nginx:
    image: nginx
    restart: always
    ports:
      - "${NGINX_HTTP_PORT:-80}:80"
      - "${NGINX_HTTPS_PORT:-443}:443"
    volumes:
      - type: bind
        source: ${NGINX_HOST_PATH:-~/nginx}
        target: /etc/nginx/conf.d/
Since you don't want to lose your data if the containers die, host folders are needed for storing the blog and the database data. A host folder is also used to store the nginx configuration files to avoid the need for building a custom nginx Docker image.
The folders are created by default under the home directory, and this default Nginx would be used:
server {
	server_name _;
	listen 80 default_server;

	location / {
		proxy_pass	http://ghost:2368;
	    proxy_set_header    X-Real-IP $remote_addr;
	    proxy_set_header    Host      $http_host;
	    proxy_set_header X-Forwarded-For $proxy_add_x_forwarded_for;

	}
	server_tokens off;
}It is not recommended to use this default nginx configuration for your public Ghost blog. You'd want to enable SSL encryption for your blog to have that fancy green lock 🔒 next to your domain name in the browser, and also to protect your credentials when accessing the Ghost admin panel.
Please check the "Adding SSL Encryption" section in the end of the post to see how you can do that.
Deploying
In order to deploy ghost, you just need to run the script provided in the github repository:
$ cd docker-ghost/

# You need to provide the file path for the env file
$ ./deploy.sh
This script takes exactly 1 argument
Usage: ./deploy $ENV_FILE_PATH

$ ./deploy.sh .env
Sourcing .env
Deploying Ghost with the following configuration:
Blog URL: http://127.0.0.1
MySQL user password: ghost1234
MySQL root password: dummy
Ghost host data folder: /home/mehdi/ghost
MySQL host data folder: /home/mehdi/mariadb_data
Nginx host config folder: /home/mehdi/nginx
HTTP port: 80
HTTPS port: 443
Confirm the deployment? (Y/N): y
Creating host folders...
Deploying...

Creating network "blog_default" with the default driver
Creating blog_nginx_1 ...
Creating blog_mariadb_1 ...
Creating blog_nginx_1
Creating blog_mariadb_1 ... done
Creating blog_ghost_1 ...
Creating blog_ghost_1 ... doneYou can see that the containers are now up and running:
$ docker ps

CONTAINER ID        IMAGE                COMMAND		CREATED             STATUS              PORTS                                      NAMES
80e93e0cbcfa        ghost:3.2.0-alpine   "docker-entrypoint.s…"   11 seconds ago      Up 10 seconds       2368/tcp                                   blog_ghost_1
0d51581b4e39        mariadb:10.4         "docker-entrypoint.s…"   13 seconds ago      Up 10 seconds       3306/tcp                                   blog_mariadb_1
974954b5d518 nginx "nginx -g 'daemon of…" 13 seconds ago Up 10 seconds 0.0.0.0:80->80/tcp, 0.0.0.0:443->443/tcp blog_nginx_1By navigating to your VM's public IP address or to (if you are running ghost on your local environment), you should now be able to access your new ghost blog:

Adding SSL Encryption
You'd also like to enable SSL encryption for your blog to avoid your admin credentials from being sent in clear-text over the internet.
Unless you already have your SSL certificate issued, you can achieve this easily with and get a new certificate. However, the validity of the certificates would be only 90 days. But luckily, the certificate renewal can be automated using .
You can install certbot easily and order a new certificate in a matter of minutes:
# Install certbot
$ sudo add-apt-repository ppa:certbot/certbot
$ sudo apt install certbot python-certbot-nginx
There are several methods for ordering a certificate using certbot, the instructions are provided depending on your OS and choice of webserver. I have opted for the standalone approach because I am running nginx in a container. The certificate and key will be created under /etc/letsencrypt/live/YOUR_DOMAIN/, so they would need to be copied to your nginx host folder:
sudo certbot certonly --standalone -m ${YOUR_EMAIL} -d ${YOUR_DOMAIN}

sudo cp /etc/letsencrypt/live/${YOUR_DOMAIN}/{cert.pem,privkey.pem} ${NGINX_HOST_PATH}/ssl/Once the files are in place, the nginx which should be under ${NGINX_HOST_PATH}/blog.conf must be modified now. Since the ${NGINX_HOST_PATH}/ will be mounted inside the container, the certificate and key files will be available in the container under the /etc/nginx/conf.d/ssl/ folder:
server {
	listen 80;
	server_name DOMAIN_NAME;
	server_tokens off;

	location / {
		return 301 https://$server_name$request_uri;
	}
}

server {
	server_name DOMAIN_NAME;
	listen 443 ssl;
	server_tokens off;

	location / {
		proxy_pass	http://ghost:2368;
	        proxy_set_header    X-Real-IP $remote_addr;
	        proxy_set_header    Host      $http_host;
		proxy_set_header X-Forwarded-Proto https;
	        proxy_set_header X-Forwarded-For $proxy_add_x_forwarded_for;
	}
	ssl_certificate     /etc/nginx/conf.d/ssl/fullchain.pem;
	ssl_certificate_key 	/etc/nginx/conf.d/ssl/privkey.pem;
}
It's important to restart the nginx container after updating the configuration file to pick up the changes:
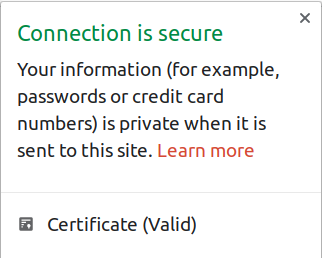
$ docker restart blog_nginx_1 Now you should see that your blog is now serving in HTTPS 🎉 :
Conclusion
In this article, I have described how you can run your ghost blog with MariaDB and nginx using Docker. Although it might seem like a lot of work, it all comes down to personal preference in the end. Personally, I like to have full control over my personal blog, and like getting my hands dirty. But this comes at the cost of having to maintain everything on my own, which I don't really mind.
If you want to focus more on the content without spending much time for creating and maintaining your blog, there are other alternatives like where you can directly start writing content after creating your account. Or you can still create your fully-managed but that comes at a price starting from 29$/month.
I hope this article was useful for you. Please feel free to leave a comment below or contact me through my email.
]]>